All seams are 1/4" for this project * Sewing/quilting experience is helpful
Create the "Top"
The checkerboard can be strip-pieced if you would like. I chose to piece each square individually for a more "scrappy" look.
Cut thirty-two 2" squares from your "dark" fabric
Cut thirty-two 2" squares from your assorted "light" fabrics. (I cut two squares each from 16 different fabrics.)
Arrange squares in a checkerboard pattern -- 8 squares x 8 squares
Sew squares into rows of 8 and then sew rows together -- matching seams -- to form checkerboard
Sew two border strips to the checkerboard on opposite sides and trim off tails to make even with the checkerboard edges
Sew on remaining two border strips and trim/square up the entire piece
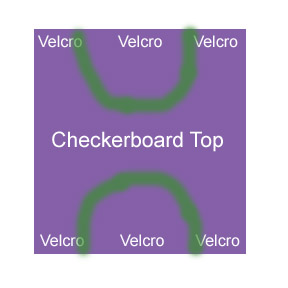
Mark or take note of the 1/4" around the entire outer edge -- you don't want to put your Velcro inside this area
Stitch on six Velcro squares on two opposite edges -- three pieces per side -- one in each corner and one in the middle (See photo)
Now the "top" is complete
Layer and "Quilt" the Pieces
Layer the "top" on the square of flannel or batting (it will be a little larger than the "top")
Stitch around in a square between the checkerboard and the border ("stitch in the ditch") to hold these two pieces together.
(You could stitch in the ditch between each square but I thought this would be more trouble than it's worth!)
Trim flannel or batting even with "top"
Create the Pocket
Take your 10" x 14" piece of pocket fabric and fold it in half lengthwise -- right sides together
Press
Stitch around all open edges leaving a small opening for turning
Turn piece right side out and hand stitch the opening to close it
Press the piece into a flat rectangle
With the rectangle placed vertically, fold up the bottom edge about 1/3 of the way
Fold the top edge down over the piece about 1/3 of the way as well
Adjust your pocket so the bottom is showing a little bit and press when you like how it looks
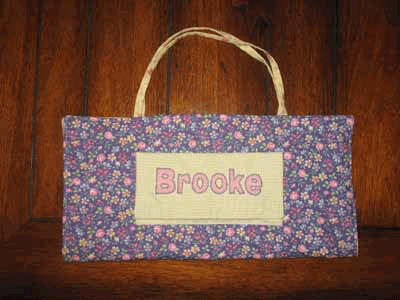
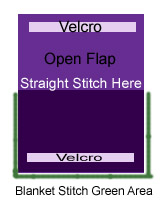
If you will be adding the child's name to the top flap, do it now. I did a fusible raw-edge applique with a blanket stitch around each letter.
Stitch on one strip of Velcro along the inside edge of the pocket flap
and the other where it will "catch" on the outside at the bottom of the pocket
Checkerboard with Carrying Case
My daughter Brooke enjoys playing checkers at school with her teacher and friends so I decided to make her a checkerboard and checkers for a Christmas gift.
I'm sure it would be just as cute using a "boy" theme as well -- but I have three daughters and two nieces so no boy stuff around here!
This was made entirely from fabric from my stash and could be completed in an afternoon.
For the checkerboard you will need
Assorted scraps for checkerboard
Six strips 1 1/2" x 15" - Four borders and two carrying straps
One 15" square of flannel or thin batting
One 15" square of backing fabric - this will be the "outside" of the case (purple in my photo)
One 10" x 14" piece of fabric for pocket
Three sets of squares from Velcro to close case
Two strips of Velcro to close pocket
Fusible web if personalizing with fusible applique
For the checkers you will need
Twenty-four 1" wooden discs (from craft store)
Two colors of acrylic paint
Gold paint pen
Glitter Glue
Clear Gloss spray
Attach the Pocket to the "Backing" or Outside of the Carrying Case
Trim the "backing" fabric so it is the same size as your "top" (I just layered mine and then trimmed
the backing to match up to the "top")
Fold your "backing" fabric in half with the right side of the fabric facing you
and the fold in the fabric closest to you
Place your pocket in the center of this area -- I just eyeballed it but you can measure if
you want to find the true center
Pin your pocket in place being careful not to catch the second layer of the backing fabric while you pin
Open up the backing fabric and set your machine for either a blanket stitch or a zig-zag
Open up the top flap of the pocket
Stitch around the bottom third of the pocket (three sides) to attach it to the backing
When you get to the place where the flap will fold down, change
your machine's stitch to a straight stitch and stitch
straight across to attach the top of the pocket and create a fold line
Creating the Straps
Take the two remaining 1 1/2" x 15" strips and fold them in half lengthwise, right sides together
Press
Stitch along the long open edge leaving the ends open
Turn straps right side out
Press
Assembling
Lay out the "top" with the checkerboard facing you and the Velcro pieces at what would be the top and bottom of the piece
Pin the straps as shown -- one on top and one on bottom matching raw edges
Baste in place if desired or be very careful to miss the pins when stitching during that upcoming step
Layer the "backing" fabric -- right side down -- on top of the "top" with the pocket toward the top
Pin to secure
Stitch around the entire piece catching the straps in the seam and leaving a large opening in the center of one of the sides for turning
Watch those pins!!
Turn the piece right side out and hand stitch opening closed
Top stitch around entire perimeter of the piece a little less than 1/4" from the edge
Top stitch a straight line across the entire piece -- outside edge to outside edge -- where the piece will be folded. You can stitch in the ditch through the center of the checkerboard as a reference -- there will be four rows of checks on each side of the line
Your checkerboard is done! Now to make the checkers....
Creating the Checkers
Using acrylic or wood paint, paint 12 disks in one color and 12 in a separate color
Let dry
Using a gold paint pen, draw little crowns on one side of each piece for when the player gets "kinged"
Put small dots of glitter glue at the end of each crown point for extra sparkle if desired
When all pieces are dry, spray them with a coat of clear gloss for protection (repeat if desired)
Let dry thoroughly before putting the checkers in the pocket!
Your checkerboard is now complete and ready for gift-giving!