All seams are 1/4" for this project * Sewing/quilting experience is helpful
Create the Bag
Choose 12 charm squares to create the outside of your bag and lay them out in two rows of six squares
Stitch these blocks together to create a long piece of fabric which will become the outside of your bag
Trim your 10" x 30" piece of muslin to match the size of the bag piece and then follow the assembly directions found here....
I made my drawstrings out of two strips of muslin
Fold each piece in half length-wise and stitch along the long edge -- the ends can remain open
Turn each strap right side out and press flat
Thread each strap through the casing as directed in the link above, tie off, and clip the ends with pinking shears to avoid fraying
Create the Bean Bags
Layer two squares wrong sides together
(Usually charm squares have pinked edges. If yours do not, you may want to use pinking shears
to cut all the edges of your squares to help prevent excessive fraying)
Stitch around the entire square 1/4" from the edge leaving an opening large enough to put your beans in
Fill your bean bags about 3/4 full (a funnel is helpful -- a 5-year-old and a 3-year-old are not helpful)
Stick a pin or two through both layers to keep the beans "back" out of your way so you can stitch the opening closed
Stitch the opening closed being sure to overlap your stitching lines so none of the beans "escape"
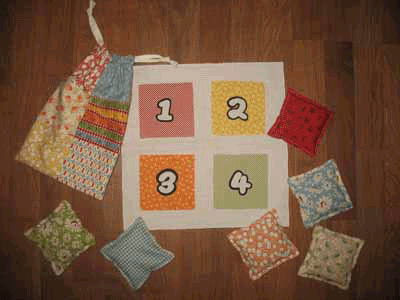
Create the "Target" Mat
This is an optional accessory -- the child can aim for a specific number or try to get a
specific "score" by tossing the bean bag on certain numbers
Press your 15" square piece of fabric
Serge or zig zag along the edge of the fabric to prevent fraying
Create numbers out of scraps and fusible web and fuse them onto charm squares
Put fusible web on the backs of the four "numbered" squares -- you will have to "re-pink" the edges after applying
the fusible so you don't end up with exposed fusible on the squares or edges with no fusible on them. USE A PRESSING SHEET!
Lay the four numbered squares evenly on the 15" square and fuse
That's all there is to it! Fold up the mat and put it in the bag along with the bean bags and you have a fun, quick child's gift!
I finished this project in an afternoon so now I have time to figure out what to do with all the leftover beans!